PDF Coming Soon

PDF Coming Soon
Holiday Catalog August 4th

Stampin' UP! Order Online

Stampin' UP! Order Online
Click image to order with me

PDF is now available!

PDF is now available!
Click image to download PDF

Featured Post

May Paper Pumpkin Kit

May 2020 Paper Pumpkin Designed with (In) Color in Mind The Paper Pumpkin team loves planning f...

Showing posts with label Rustic Christmas. Show all posts

Thursday, October 17, 2019

Other crafty items I create

I not only create cards but also craft other items. I am currently working on Autumn/Fall and Christmas items. Here are some pictures of some of the items I am working on. 


Halloween wreath made with Dollar Tree items. Plaque, mesh ribbon, wreath form and butterflies. The plaque says " Home of a handsome devil, a wicked witch and their little monsters.


Here is my Autumn tiered tray I decorated.


This was my mother in laws and I re-purposed it. I painted it white, added the valance and decorated it with the scarecrows and flowers for fall. Come Christmas I will redecorate it.


These are yardstick swags. These are easy to make and I sold several at a craft fair.


My daughter wanted a centerpiece for her table at Christmas. She gave me the box and I started decorating it. I first added the poinsettias, then the frosted foliage. I felt it needed more. I inherited my mother in laws craft items. I decided to go through them and found the Holly. I added it and then added the bird. I decorated the other side the same way. I should my daughter and she fell in love with it and then proceeded to tell me the Holly was from her wedding. I then remembered it was around the cake. I knew then that my mother in law had been the one nudging me to add it to the centerpiece. This will always have a special meaning to my daughter.


I love snow! Winter is my favorite season and Christmas my favorite holiday. So what better way to have snow inside than a basket of faux snowballs. Cardinals are my favorite bird so I added it to my basket.


This snowman I got from the dollar tree. It is actually three pumpkins with a witches hat. I turned it over and decorated it as snowman. 


Come Shop with me: www.donnaschnees.stampinup.net 
Also do not forget to subscribe to my blog to see new specials and updates. 
Any questions? Please email me at: donnaschnees2008@embarqmail.com 
If you are having trouble with leaving comments, please email me and let me know. Thank you:)

Thursday, November 1, 2018

12 Days of Christmas-Day 1 Be Merry Banner


I love when I get inspired by another piece of work. I was at Big Lots and came across this sign. I knew I had to make a banner. 

Did you notice the bag in the background. Does it look like one of our stamp sets? I love how Stampin' Up! is in with the upcoming fashion!


Supplies: 

42 inches of Striped Burlap Ribbon 
8 1/2 x 11 piece of Galvanized Metallic Paper 
5 1/2 x 4 1/4 piece of Cherry Cobbler 
Print out of Pennant www.fairytales.com 
7 pieces of Galvanized Clips 
Tuxedo Black Ink 
Stampin Dimensionals 
Buffalo Check Stamp

I found a pennant on the internet from www.fairytales.com that worked perfectly for my banner. I cut them out of galvanized cardstock and fold the ends over. I then placed each one over the Striped Burlap ribbon and adhered them with the galvanized clips.

I then took some Cherry Cobbler cardstock and then I stamped it with the Buffalo Check stamp in Tuxedo Black. I then cut out the word "Be Merry" with the large letter framelits. I then adhered them to the pennant with dimensionals.


Must see movie to watch!


Operation Christmas
As her new romance blossoms, a single mother is dismayed when her boyfriend, a military sergeant, is deployed right before Christmas. Determined to not let it ruin the holidays for her and her children they decide to give back to the struggling military families on his base and, as their efforts go viral, they are rewarded in ways they never imagined. iew larger imagem


Product List


I would love to hear your comments and do not forget about the hostess code for a free gift during this months campaign. If order exceeds $150.00 do not use hostess codes so you can get the extra hostess rewards and you will get the free item automatically.

Thursday, August 23, 2018

Christmas Card Challenges

Rustic Hawaiian Christmas Card

I love things that are rustic. I love that old time country look and feel. I made this card to give it a Hawaiian rustic feel and I feel I accomplished it with this card. This card uses a few new items from the Holiday catalog. I am using the new Galvanized CS and Festive Farmhouse elements for the word merry. See how that galvanized sparkles in the cameras view, I love how it pops.
 I also love how the word merry is in a nice shade of grey to blend in with the cards elements.
 This card is just beautiful! What do you think of it?

Challenges I am entering the card in:


Product List
Shop with me, just go to the sidebar on the right and click on the "Come Shop with me" button or click on any of the products above to go straight to my store. Also do not forget to subscribe to my blog to see new specials and updates. Any questions? Please email me at: donnaschnees2008@embarqmail.com

Thursday, November 2, 2017

Rustic Ornaments with a Stampin' Up! flair

I had some of the Candlelight Christmas fabric left over and thought they had a rustic feel to them so I made some ornaments. The first is quite easy. Just wrap the fabric around a 3" foam ball and tie a piece of jute around and then add a jute hanger with hot glue and your done. The other one, I took a ribbon spool to make the ornament. I cut the fabric into 1" wide and 4" long strips and tied them to the spool. When I was done I trimmed up the long ends to be more uniform and added a jute hanger to it also. Isn't it gorgeous! I am going to have to buy some more if I can find it.

Saturday, October 28, 2017

Rustic Christmas Card & Card Challenges

I just love all things rustic. When our team lead gave us this months challenge as soon as I saw the elements I immediately thought rustic! I used Crumb Cake for the card base, I then stamped the hardwood stamp in Crumb Cake on Whisper White card stock. I then took a piece of Early Espresso  card stock and stamped the hardwood in Early Espresso also. I die cut the swirly scribble in Gold foil, the jar in Whisper White, pine cones in Dazzling Diamonds and Red glimmer paper plus in Early Espresso. I die cut some twigs and berries. The tree and deer came from our team lead. I did not have the dies but I knew I wanted them in glimmer paper so I traced them and cut them out. I cut the tree shorter so it could fit on my shelf. I pepped them up with dimensional. I then put the ribbon at the top of the wreath and finally added a piece of the new foil snowflake to the shelf. I had a lot of fun creating this card and I love BLING!


Challenges I am participating in:
Wood or Canvas -52 Christmas Card Throwdown-CCT20
Anything Goes-Sweet Stampin Christmas
U for Unlimited, V for Vibrant-ABC Christmas Challenge
Merry Monday #263 Photo Inspiration

Friday, October 20, 2017

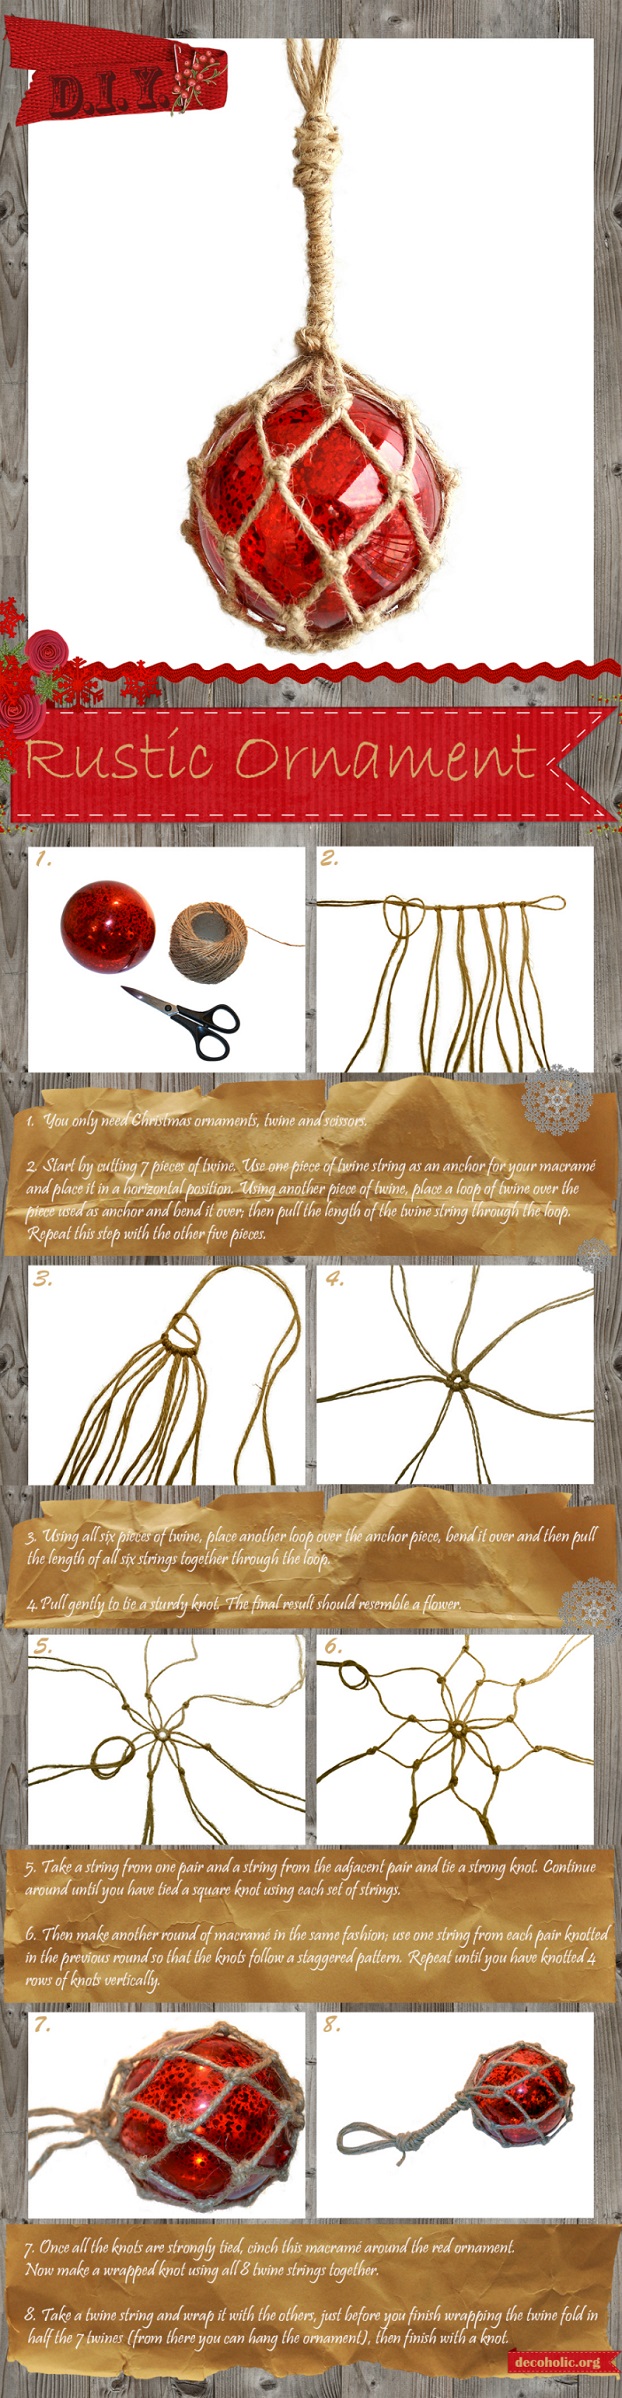
DIY Rustic Macramé Christmas Ornament

This year we are doing Rustic Christmas. So I will be sharing ideas between now and Christmas and I hope you enjoy along with the Stampin Up cards and ideas I will be sharing along the way.

DIY Rustic Macramé Christmas Ornament

DIY Rustic Macramé Christmas Ornament
Legal and Copy Write Information: This is the personal blog of Donna Schnees, Independent Stampin' Up! Demonstrator. All rights to submit any of these projects for contests belong to Donna Schnees only. The content of this blog is my sole responsibility as an Independent Stampin' Up! Demonstrator. Stampin' Up! does not endorse the use of or contents of the services, or non-Stampin' Up! products I may offer here. Images ©1990-2018 Stampin' Up!

Contact Me

Name

Email *

Message *

Host Code Information

Please use the current Stampin' Up! Rewards Host Code (shown at the the top of this blog) when ordering through my on-line store to earn yourself an extra gift for SU! Orders over $75.00 get a free gift from me as a Thank You for ordering.


Though if your SU! order is over $150 - then please don't use this code! Please claim your own Stampin' Rewards instead... and you will still get a gift from me...!


Any such gifts are from me personally and will be posted separately to your Stampin' Up! order... so PLEASE DO NOT select NO CONTACT when checking out... as I do not know who - or where- you are ...and I will not be able to send you your free gift.


Also for every $50.00 spent you will receive a coffee bean and after you receive 8 beans you will receive a FREE $40.00 product of your choice (Beans earned will expire 2 years from earn date and Bean Rewards must be redeemed within the month of qualifying for free product)
for more info click on Coffee Bean Rewards bar above.


I ONLY SHIP TO US RESIDENTS ONLY PER STAMPIN' UP! POLICY. Thank you for understanding.